
Animated Flags Pack
The Making Of: Animated Flags Pack
Once again, I'd like to share another The Making Of devlog from Screaming Brain Studios! Keep in mind that while the software I use is abandoned or unavailable, many of the techniques I use can still be replicated. All Screaming Brain Studios tutorials are the result of translating techniques from unavailable and abandoned graphics software to modern alternatives and attempting to replicate them in programs like GIMP or Photoshop so they can be repeated by anyone. While my workflow is generally much simpler than this since I use specialized software, I want everyone to be able to replicate these techniques.
To start, we need to create a grayscale displacement map to form the basis for the flag animation. This same image will be used to apply both the warping/waving flag effect to the texture, as well as the final shading effect that gives the flag a bit of depth.
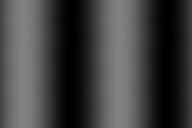
This is simply a gradient with a frequency value of 200. This was created using a tool that can keep all the edges seamless, but can be made using any software that can create gradients in this manner. Using the smudge tool and a couple passes of blur filters, the result ends up looking more usable.

Next, a scrolling effect is applied to the displacement map so that it moves towards the right edge. This is what will create the waving flag animation when we use this to displace our flag texture.

This doesn't currently look like much more than blurry blobs at the moment. Once we combine this scrolling displacement map with our flag texture, things will start to look a little bit more interesting. First, we need to make a texture that is equal to the size of our displacement map. (Or make the displacement map the same size as the flag texture, either way)
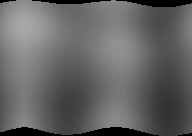
If we apply the displacement map as shading to our texture, but without any displacement, we can sort of see how the displacement map affects the flag texture in a way that resembles rippling.

Let's see what happens when we apply a displacement filter using the scrolling displacement map. This uses the grayscale displacement map to shift the pixels in the image up or down, based on the grayscale values in the displacement map.

The flag still looks a bit flat, so we need to combine this with the displacement map once again to apply some shading to the final flag. In order to properly do this, I first used the displacement map to apply the same displacement to itself, in the same manner that I did with the flag texture.
The final step is to use the Grain Merge blend mode in GIMP to combine the wavy displacement map with the wavy flag texture to apply the shading. This will combine the light and dark values in the displacement map with the flag texture and give it the final appearance we want.

And there you have it! This simple technique lets you create beautiful, animated waving flags in no time at all!
If you would like to use the included Flag Shading Sprite Sheet that comes with the Animated Flags Pack to apply shading to your own modified or customized unshaded flag sprite sheets, first open the desired sprite sheet you wish to shade in GIMP. Now simply import the Flag Shading Sprite Sheet as a new layer above the desired unshaded flag sprite sheet.
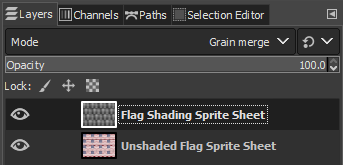
Change the layer Blend Mode to Grain Merge to see the shading effect applied to your unshaded sprite sheet. This particular blend mode can be used for all kinds of lighting and shading effects, and you can see the results across many of the Screaming Brain Studios asset packs.
Leave a comment
Log in with itch.io to leave a comment.